[WEB] certbot으로 Let's Encrypt 인증서 발급 받기

Let's Encrypt는 TLS 인증서를 무료로 발급해주는 서비스이고, certbot은 Let's Encrypt에서 인증서 발급을 간단하게 할 수 있는 CLI 도구이다. certbot과 Let's Encrypt에 대한 자세한 설명은 생략한다. 아래 링크 참고
인증서 발급 절차
-
certbot 설치
sudo apt-get update sudo apt-get install -y certbot -
wildcard 인증서보다는 사용할 서브 도메인만 축소해서 관리하는 것이 보안적으로 더 안전하기 때문에 여기서는 사용할 서브 도메인으로 인증서를 발급받는다.
sudo certbot certonly --manual -d "3min.yonghochoi.com"- option으로 —manual을 지정하여 webroot 방식으로 인증서를 사용할 대상 서버의 임의의 URL로 접근하여 검증하는 방식을 사용한다.
-
인증서 요청을 하고 있는 서버의 public IP가 기록되어도 되는지에 대한 질문이 나오는데 원치 않을 경우에는 별도 설정이 필요하다. 나의 경우 기록되어도 상관 없으므로 다음 질문에 Yes 응답
Saving debug log to /var/log/letsencrypt/letsencrypt.log Plugins selected: Authenticator manual, Installer None Starting new HTTPS connection (1): acme-v02.api.letsencrypt.org Obtaining a new certificate Performing the following challenges: http-01 challenge for 3min.yonghochoi.com - - - - - - - - - - - - - - - - - - - - - - - - - - - - - - - - - - - - - - - - NOTE: The IP of this machine will be publicly logged as having requested this certificate. If you're running certbot in manual mode on a machine that is not your server, please ensure you're okay with that. Are you OK with your IP being logged? - - - - - - - - - - - - - - - - - - - - - - - - - - - - - - - - - - - - - - - - (Y)es/(N)o: Y -
인증서를 발급 받을 대상 서버가 유효한 서버인지 확인하기 위해 아래 가이드대로 진행한다.
 - - - - - - - - - - - - - - - - - - - - - - - - - - - - - - - - - - - - - - - -
 Create a file containing just this data:

 3lamZLoXrFs6rA-JaSDFaASdfdfFAs5RDYBFwfH_Yk.KqBwMpQm8jaJkA3wQzMHwW11mFU2GnFgQAAYdA8ZmTk

 And make it available on your web server at this URL:

 http://3min.yonghochoi.com/.well-known/acme-challenge/3lamZLoXrFs6rA-JaSDFaASdfdfFAs5RDYBFwfH_Yk
 - - - - - - - - - - - - - - - - - - - - - - - - - - - - - - - - - - - - - - - -
 Press Enter to Continue
위 가이드대로 진행이 될 때까지 Command line은 Enter 키가 입력될 때까지 대기한다. 아래 절차대로 검증을 위한 설정을 진행한다.
-
대상 웹서버에서 static file의 root 디렉토리로 이동한다. nginx의 경우 /etc/nginx/conf.d/default.conf 파일에서 경로를 확인할 수 있다. (nginx 설치 방법에 따라 해당 위치는 다를 수 있다.)
server { listen 80; server_name 3min.yonghochoi.com; root html; location / { root /usr/share/nginx/html; index index.html index.htm; } ... 생략 ... }- 위 설정에서 root 부분에 설정된 /usr/share/nginx/html 디렉토리 안에 static 파일들이 저장되어 있다.
-
/usr/share/nginx/html 경로에서 .well-known/acme-challenge 디렉토리를 생성한다. (웹서버와 설정에 따라 경로는 다를 수 있으므로 각자 환경에 맞춰 확인해야함)
mkdir -p /usr/share/nginx/html/.well-known/acme-challenge -
생성한 디렉토리 내에 인증서 발급과정에서 알려준 확인용 데이터가 담긴 파일을 생성한다.
echo "3lamZLoXrFs6rA-JaSDFaASdfdfFAs5RDYBFwfH_Yk.KqBwMpQm8jaJkA3wQzMHwW11mFU2GnFgQAAYdA8ZmTk" > /usr/share/nginx/html/.well-known/acme-challenge/3lamZLoXrFs6rA-JaSDFaASdfdfFAs5RDYBFwfH_Yk
-
-
4번에서 인증서를 발급받는 사용자의 Enter 키를 기다리며 대기하고 있었을 것이다. 4번 내 절차가 모두 완료되면 Enter 키를 입력하여 검증을 진행한다. 정상적으로 설정된 경우 아래와 같이 발급이 성공했음을 알려주는 메시지가 표시된다.
Waiting for verification... Cleaning up challenges IMPORTANT NOTES: - Congratulations! Your certificate and chain have been saved at: /etc/letsencrypt/live/3min.yonghochoi.com/fullchain.pem Your key file has been saved at: /etc/letsencrypt/live/3min.yonghochoi.com/privkey.pem Your cert will expire on 2020-12-05. To obtain a new or tweaked version of this certificate in the future, simply run certbot again. To non-interactively renew *all* of your certificates, run "certbot renew" - If you like Certbot, please consider supporting our work by: Donating to ISRG / Let's Encrypt: https://letsencrypt.org/donate Donating to EFF: https://eff.org/donate-le -
인증서 발급이 완료되면 /etc/letsencrypt 디렉토리에서 인증서 파일을 확인할 수 있다.
 /etc/letsencrypt/live/3min.yonghochoi.com# ls -l
 total 4
 -rw-r--r-- 1 root root 682 Sep  6 23:28 README
 lrwxrwxrwx 1 root root  43 Sep  6 23:28 cert.pem -> ../../archive/3min.yonghochoi.com/cert1.pem
 lrwxrwxrwx 1 root root  44 Sep  6 23:28 chain.pem -> ../../archive/3min.yonghochoi.com/chain1.pem
 lrwxrwxrwx 1 root root  48 Sep  6 23:28 fullchain.pem -> ../../archive/3min.yonghochoi.com/fullchain1.pem
 lrwxrwxrwx 1 root root  46 Sep  6 23:28 privkey.pem -> ../../archive/3min.yonghochoi.com/privkey1.pem
Nginx에서는 아래 두 파일이 사용된다.
- privkey.pem : 비밀키 파일
- fullchain.pem : 인증서와 체인 인증서가 합쳐진 전체 파일
nginx에 연동
nginx 설정에 위에서 발급받은 인증서를 아래와 같이 설정해준다.
server {
    listen       443 ssl;
    server_name  3min.yonghochoi.com
    root         html;

    ssl_certificate      /etc/letsencrypt/live/3min.yonghochoi.com/fullchanin.pem
    ssl_certificate_key  /etc/letsencrypt/live/3min.yonghochoi.com/privkey.pem;
    ssl_session_timeout  5m;
    ssl_protocols  SSLv2 SSLv3 TLSv1;
    ssl_ciphers  HIGH:!aNULL:!MD5;
    ssl_prefer_server_ciphers   on;
    ... 생략 ...
}
설정을 적용한 후에 브라우저로 접속해보면 아래와 같은 경고 메시지가 표시된다.

ERR_SSL_OBSOLETE_VERSION 경고는 현재 사용하고 있는 TLS 버전이 오래된 버전이라서 안전하지 않다는 경고이고, 이는 Chrome81에서 완전히 차단될 예정이라서 처리를 해주는 것이 좋다.
nginx 설정을 수정하여 오래된 TLS 버전은 1.0과 1.1을 의미하기 때문에 아래와 같이 1.2 이상으로 수정한다.
ssl_protocols TLSv1.2;
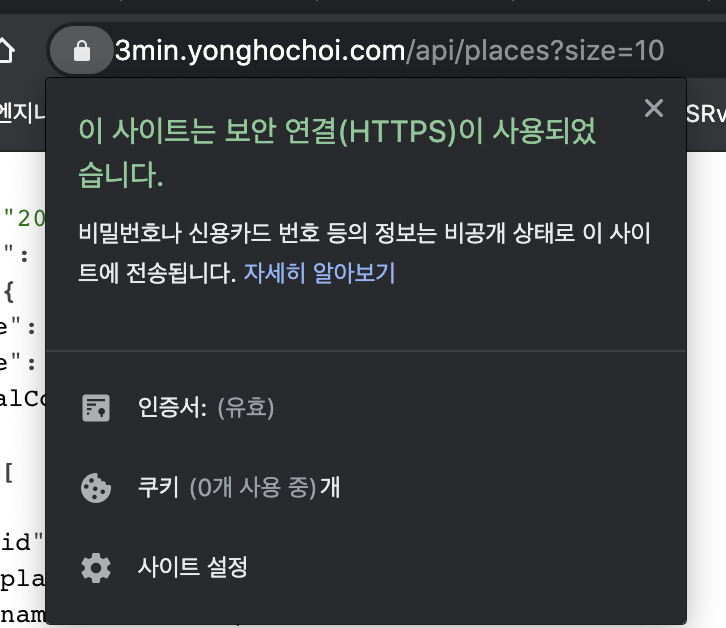
이후 nginx를 재시작하고 접속하면 아래와 같이 안전하게 연결에 성공한다.
인증서 갱신
생성된 인증서는 90일 동안 유효하고, 30일이 남은 시간부터 갱신이 가능하다. 정기적인 갱신을 위해 crontab을 사용한다. certbot은 root 권한으로 실행이 되기 때문에 root 계정으로 전환 후 crontab 등록을 한다.
sudo -i
crontab -e

0 0 1 1-12/3 * /bin/bash -l -c 'certbot renew --quiet'
참고
HTTPS를 위한 공인인증서 - Let’s Encrypt 발급
2020-06-02: 매뉴얼 방식 수정2020-02-02: 최초 작성
blog.thinkbee.kr