앱을 사용하면서 메뉴 화면이 슬라이딩 되는 것이 신기하기도 하고 구현하기가 굉장히 어렵고 노가다가 많을 것 같다는 생각이 들었었는데 Flutter를 사용하면 의외로 간단하게 만들 수 있다. 먼저 간단한 테스트를 위한 앱이기 때문에 동적으로 액션이 들어가는 부분이 없어서 StatelessWidget으로 생성하고, 앱 화면을 그리기 위해 Scaffold 위젯을 사용하였다. body는 중요하지 않아 임의의 텍스트를 표시하였다.
class MyApp extends StatelessWidget {
  // This widget is the root of your application.
  @override
  Widget build(BuildContext context) {
    return MaterialApp(
      title: 'Appbar',
      theme: ThemeData(
        primarySwatch: Colors.red,
      ),
      home: MyHomePage(),
    );
  }
}

class MyHomePage extends StatelessWidget {
  @override
  Widget build(BuildContext context) {
    return Scaffold(
      body: Text('sample'),
    );
  }
}
Drawer 위젯을 만들기 전에 먼저 상단의 햄버거 버튼을 사용하여 클릭 시 메뉴가 왼쪽에서 슬라이딩 되어 나오도록 할 것이기 때문에 먼저 Appbar를 간단하게 만들어본다.
class MyHomePage extends StatelessWidget {
  @override
  Widget build(BuildContext context) {
    return Scaffold(
      appBar: AppBar(
          title: Text('Appbar'),
          centerTitle: true,
          elevation: 0.0,
        ),
      body: Text('sample'),
    );
  }
}
AppBar를 생성할 때 텍스트를 가운데 정렬하고 elevation 속성을 0.0으로 지정하여 AppBar의 입체감을 없애주었다. (굳이 할 필요는 없다.) 위 코드를 저장하고 Simulator를 실행해보면 아래와 같은 화면을 볼 수 있다.

이제 이 AppBar에 Drawer 위젯을 사용하여 메뉴를 표시할 수 있는 햄버거 버튼을 만들고, 버튼 클릭시 나타나는 메뉴에 현재 사용자를 나타내는 프로필 이미지와 다른 사용자를 의미하는 이미지를 사용할 것이다. 이미지 사용을 위해서는 현재 프로젝트에 이미지를 복사하고, 해당 이미지의 경로를 pubspec.yaml 파일에 명시해주어야 한다. 나는 프로젝트 루트 디렉토리에 assets 디렉토리를 만들고 하위에 이미지를 추가하였다.
pubspect.yaml 파일에는 아래와 같이 두 이미지의 경로를 입력해준다. (다른 설정들은 생략하였다)
... 생략 ...

flutter:
  ... 생략 ...
  # To add assets to your application, add an assets section, like this:
  assets:
    - assets/yongho.jpg
    - assets/github.png

... 생략 ...
이 후에는 main.dart 파일에서 해당 이미지를 가져와서 사용할 수 있다. 먼저 Drawer 위젯에는 사용자의 정보가 들어가는 UserAccountsDrawerHeader 위젯을 사용할 것이고, 그 하위에 간단하게 ListTile 위젯으로 메뉴를 표시해볼 것이다. 아래와 같이 사용자 프로필 영역에 프로필 이미지를 삽입할 수 있다.
UserAccountsDrawerHeader(
  currentAccountPicture: CircleAvatar(
    backgroundImage: AssetImage('assets/yongho.jpg'),
    backgroundColor: Colors.white,
  ),
)
프로필 이미지를 동그란 영역 안에 표시하기 위해 CircleAvatar 위젯을 사용하였고 AssetImage 위젯을 사용하여 앞서 pubspec.yaml에 설정했던 이미지를 불러왔다. backgroundColor를 지정한 이유는 가져온 이미지가 배경색이 투명인 경우 원치 않는 배경색이 들어가기 때문에 명시적으로 white를 지정해주었다. UserAccountsDrawerHeader 위젯에는 아래와 같이 현 사용자 프로필 사진 외에도 다른 사용자로 로그인하기 위한 프로필 이미지도 삽입할 수 있다.
UserAccountsDrawerHeader(
  currentAccountPicture: CircleAvatar(
    backgroundImage: AssetImage('assets/yongho.jpg'),
    backgroundColor: Colors.white,
  ),
  otherAccountsPictures: [
    CircleAvatar(
      backgroundImage: AssetImage('assets/github.png'),
      backgroundColor: Colors.white,
    )
  ],
)
otherAccountsPictures 속성이 Array 형식으로 되어 있다는 의미는 다수의 다른 사용자 프로필 이미지를 넣을 수 있다는 의미이다. 여기서는 간단하게 하나만 넣어본다. UserAccountsDrawerHeader 위젯의 클래스 내용을 살펴보면 아래와 같이 @requred로 표시된 필드들이 존재한다.
const UserAccountsDrawerHeader({
    Key key,
    this.decoration,
    this.margin = const EdgeInsets.only(bottom: 8.0),
    this.currentAccountPicture,
    this.otherAccountsPictures,
    @required this.accountName,
    @required this.accountEmail,
    this.onDetailsPressed,
    this.arrowColor = Colors.white,
  }) : super(key: key);
this.accountName과 this.accountEmail과 같이 @requered가 붙은 필드들은 위젯 사용시 반드시 입력을 해주어야하는 값이기 때문에 위젯 내용에 추가해준다. 그리고 프로필에서 디테일 메뉴를 표시하고 싶은 경우에는 onDetailsPressed 속성을 사용하여 이벤트 함수를 지정할 수가 있는데 사용자 프로필 오른편에 나타나는 화살표를 클릭하면 해당 함수가 실행된다.
accountName: Text('yongho'),
accountEmail: Text('yongho1037@gmail.com'),
onDetailsPressed: () {
  print('arrow is clicked');
},
추가적으로 사용자 프로필의 박스 영역이 기본 각진 사각형의 모양인데 decoration 속성을 지정하여 효과를 줄 수도 있다. 여기서는 아래 코드와 같이 하단을 둥글게 표시하도록 설정한다.
decoration: BoxDecoration(
    color: Colors.red[200],
    borderRadius: BorderRadius.only(
        bottomLeft: Radius.circular(40.0),
        bottomRight: Radius.circular(40.0)
    )
),
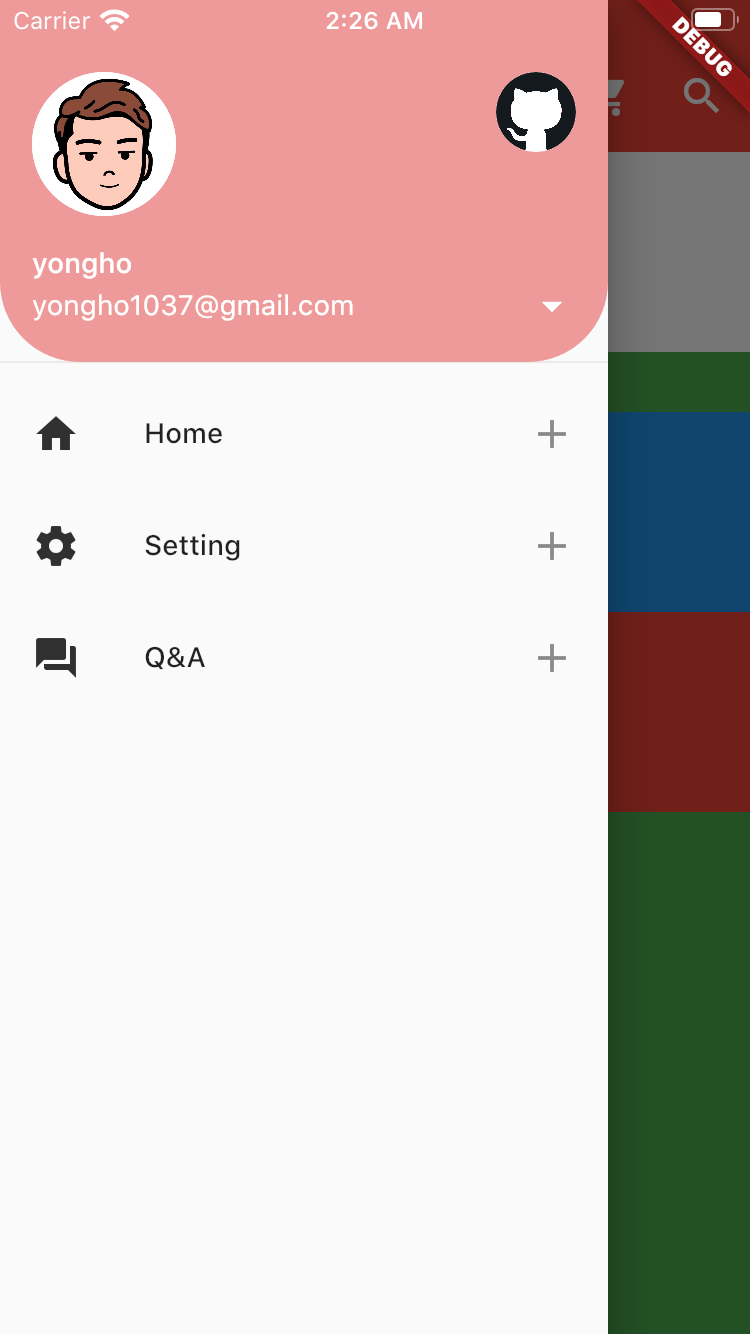
여기까지 구현하고 나면 아래와 같은 사용자 프로필을 볼 수 있다.

이제 프로필 아래에 ListTile 위젯을 사용하여 간단한 메뉴를 표시해본다.
ListTile(
  leading: Icon(Icons.home, color: Colors.grey[850]),
  title: Text('Home'),
  onTap: () {
    print('Home is clicked');
  },
  trailing: Icon(Icons.add),
),
메뉴 왼편에는 아이콘 표시하고, 아이콘 오른편에 텍스트를 표시한다. 그리고 마지막으로 텍스트의 오른편에 + 모양의 아이콘을 표시해준다. 해당 메뉴를 클릭했을 때의 이벤트를 위해 onTab 속성에 이벤트 함수를 지정해주는데 여기서는 간단히 콘솔창에 로그를 찍어 본다. 위 코드와 동일한 형태로 Setting과 Q&A 메뉴도 추가했다.
ListTile(
  leading: Icon(Icons.home, color: Colors.grey[850]),
  title: Text('Home'),
  onTap: () {
    print('Home is clicked');
  },
  trailing: Icon(Icons.add),
),
ListTile(
  leading: Icon(Icons.settings, color: Colors.grey[850]),
  title: Text('Setting'),
  onTap: () {
    print('Setting is clicked');
  },
  trailing: Icon(Icons.add),
),
ListTile(
  leading: Icon(Icons.question_answer, color: Colors.grey[850]),
  title: Text('Q&A'),
  onTap: () {
    print('Q&A is clicked');
  },
  trailing: Icon(Icons.add),
),
이제 저장하고 결과를 확인해보면 아래와 같은 화면을 볼 수 있다.
지금까지 작성한 전체 코드는 다음과 같다.
import 'package:flutter/material.dart';
import 'package:fluttertoast/fluttertoast.dart';

void main() {
  runApp(MyApp());
}

class MyApp extends StatelessWidget {
  // This widget is the root of your application.
  @override
  Widget build(BuildContext context) {
    return MaterialApp(
      title: 'Appbar',
      theme: ThemeData(
        primarySwatch: Colors.red,
      ),
      home: MyHomePage(),
    );
  }
}

class MyHomePage extends StatelessWidget {
  @override
  Widget build(BuildContext context) {
    return Scaffold(
      appBar: AppBar(
          title: Text('Appbar'),
          centerTitle: true,
          elevation: 0.0,
          ),
      body: Text('sample'),
      drawer: Drawer(
        // 앱바 왼편에 햄버거 버튼 생성
        child: ListView(
          padding: EdgeInsets.zero,
          children: [
            UserAccountsDrawerHeader(
              currentAccountPicture: CircleAvatar(
                backgroundImage: AssetImage('assets/yongho.jpg'),
                backgroundColor: Colors.white,
              ),
              otherAccountsPictures: [
                CircleAvatar(
                  backgroundImage: AssetImage('assets/github.png'),
                  backgroundColor: Colors.white,
                )
              ],
              accountName: Text('yongho'),
              accountEmail: Text('yongho1037@gmail.com'),
              onDetailsPressed: () {
                print('arrow is clicked');
              },
              decoration: BoxDecoration(
                  color: Colors.red[200],
                  borderRadius: BorderRadius.only(
                      bottomLeft: Radius.circular(40.0),
                      bottomRight: Radius.circular(40.0))),
            ),
            ListTile(
              leading: Icon(Icons.home, color: Colors.grey[850]),
              title: Text('Home'),
              onTap: () {
                print('Home is clicked');
              },
              trailing: Icon(Icons.add),
            ),
            ListTile(
              leading: Icon(Icons.settings, color: Colors.grey[850]),
              title: Text('Setting'),
              onTap: () {
                print('Setting is clicked');
              },
              trailing: Icon(Icons.add),
            ),
            ListTile(
              leading: Icon(Icons.question_answer, color: Colors.grey[850]),
              title: Text('Q&A'),
              onTap: () {
                print('Q&A is clicked');
              },
              trailing: Icon(Icons.add),
            ),
          ],
        ),
      ),
    );
  }
}
참고
'Work > 개발 노트' 카테고리의 다른 글
| [Go언어] embedded struct bson marshaling 시 struct 이름으로 키가 생성되는 문제 (0) | 2020.09.18 |
|---|---|
| [Go언어] tcp로 웹 서버 구동시 tcp6로 Listen (0) | 2020.09.14 |
| [WEB] certbot으로 Let's Encrypt 인증서 발급 받기 (1) | 2020.09.07 |
| [WEB] 쿠키 개념 잡기 (0) | 2020.09.06 |
| [WEB] 토큰 기반 인증 (2) | 2020.09.04 |


댓글